
Table of Contents
- What Does the E-2X Error Mean?
- Symptoms of a Samsung E-2X Error
- What Causes the E-2X Error
- Safety Warnings
- Related Samsung Microwave Error Codes
- Where to Find Your Manual
- Step-by-Step Troubleshooting
- Replacement Parts You May Need
- Specs & Compatible Models
- Warranty Considerations
- Maintenance Tips to Prevent E-2X Errors
- DIY Tutorial: What You Can Safely Check Yourself
- FAQs
A Samsung microwave flashing an E-2X code — most commonly E-21 or E-22 — is telling you one of its internal sensors has stopped reporting reliable data. Unlike the keypad or door errors, this family sits deeper in the appliance, so it’s worth understanding exactly what’s being flagged before you decide whether to DIY it or call a technician. This guide is part of the TechSolved appliance error-code library, where every fix is checked against real manufacturer and repair-technician sources before publishing.
What Does the E-2X Error Mean?
Samsung’s own diagnostic guide groups E-2X as the temperature sensor error family — <cite index=”51-1″>E-21 is an open temperature sensor error and E-22 is a short temperature sensor error</cite>, both meaning the control board can no longer get a valid reading from the sensor that monitors cooking temperature. A closely related but separate family, E-6X, covers the humidity/gas sensor <cite index=”51-1″>(E-61 open, E-62 short, E-63 T1 max time)</cite> used for steam-sensing “Sensor Cook” features — the two are often lumped together publicly since both sensors work together to judge doneness.
A Quick Clarification Worth Knowing
If you’ve seen this error referred to as a “humidity sensor” issue, that’s a common mix-up worth untangling: <cite index=”44-1″>Samsung’s own technician quick-guide separates these into distinct families — gas sensor errors (E-1X), temperature sensor errors (E-2X), and humidity sensor errors (E-6X)</cite> as separate diagnostic groups. In practice, both the temperature and humidity/gas sensors feed the same automatic cooking algorithms, so a fault in either can produce similar symptoms (inconsistent heating, sensor-cook functions failing), which is likely why the two get conflated in casual troubleshooting write-ups. This article covers the E-2X (temperature sensor) family in depth, with the closely related E-6X humidity sensor codes noted throughout since the causes and fixes largely overlap.
<cite index=”52-1″>The temperature sensor monitors internal cooking temperature and reports back to the control board — when it malfunctions or loses connection, the board can’t get accurate readings</cite>, which is exactly what triggers E-21 or E-22.
Symptoms of a Samsung E-2X Error
- “E-21,” “E-22,” or “C-20” on the display (C-20 is an equivalent legacy code on some models)
- Sensor-cook functions (popcorn, reheat, auto-cook) fail or heat inconsistently
- Microwave starts then shuts off shortly into a cycle
- Error appears intermittently, especially after heavy steam-producing cooking
- On related humidity sensor faults, auto-sensor modes misjudge doneness even though manual timed cooking still works
What Causes the E-2X Error
| Cause | How Common | What’s Happening |
|---|---|---|
| Food residue or grease on the sensor | Very common | <cite index=”45-1″>Residue on the sensor gives false readings</cite>, especially after boil-overs or greasy cooking |
| Loose or corroded wiring harness | Common | <cite index=”55-1″>Jiggly or corroded connections between the sensor and control board cause glitches</cite> |
| Failed/open or shorted sensor | Common on older units | The sensor itself degrades and reports an open or short circuit rather than a valid reading |
| Blocked ventilation (OTR models) | Common | <cite index=”56-1″>Blocked grease or charcoal filters restrict airflow, causing heat buildup that skews sensor readings</cite> |
| Failing magnetron or cooling fan | Less common | <cite index=”56-1″>If the error returns after cleaning, the magnetron cooling fan may be blocked or failing, or the magnetron itself is aging</cite> |
| Main control board fault | Less common | <cite index=”53-1″>The board itself is defective and misreads a working sensor’s signal</cite> |
Safety Warnings
Read this before doing anything beyond basic cleaning.
- <cite index=”49-1″>Microwaves contain a high-voltage capacitor that can retain a lethal charge of up to 4,000 volts even when unplugged.</cite> This isn’t a component you should ever attempt to test or discharge yourself.
- <cite index=”56-1″>Any repair requiring cabinet removal needs the high-voltage capacitor safely discharged first — this is a professional-service job, not a DIY one.</cite>
- The temperature/humidity sensors themselves sit inside the cooking cavity and are generally accessible without opening the high-voltage section, but the wiring often runs back to the control board behind the outer wrapper panel — <cite index=”45-1″>accessing it typically means uninstalling the entire microwave and removing the outer wrapper (left, top, and right panels as one piece)</cite>, which is a bigger job than it sounds.
- If you ever notice sparking, a burning smell, or smoke, <cite index=”56-1″>stop using the microwave immediately and call for service</cite> rather than continuing to troubleshoot.
Related Samsung Microwave Error Codes
- C-20 — <cite index=”58-1″>Legacy-model equivalent of E-21/E-22, also indicating the temperature sensor is open or short.</cite>
- E-61 / E-62 / E-63 — The true humidity/gas sensor error family; same general causes (residue, wiring, sensor failure) and similar fixes to E-2X.
- E-24 / C-21 — <cite index=”58-1″>Appears when internal temperature rises above the limit during operation (fire sensed)</cite> — a related but distinct overheat protection code, not a sensor malfunction.
- E-11 / E-12 — <cite index=”43-1″>Gas sensor open/short errors</cite>, part of the E-1X family that also feeds automatic sensor-cook functions.
[Internal link: Samsung Microwave Error Codes — Complete Reference]
Where to Find Your Manual
- Check the inner left wall or door frame for the model/serial sticker.
- On over-the-range models, check inside the vent grill area above the unit.
- Model numbers typically start with ME, MC, SMH, or MS.
- Search the exact model on Samsung’s official support site for the full downloadable manual and diagnostic code table.
- [Internal link: How to Find Your Samsung Appliance Model Number]
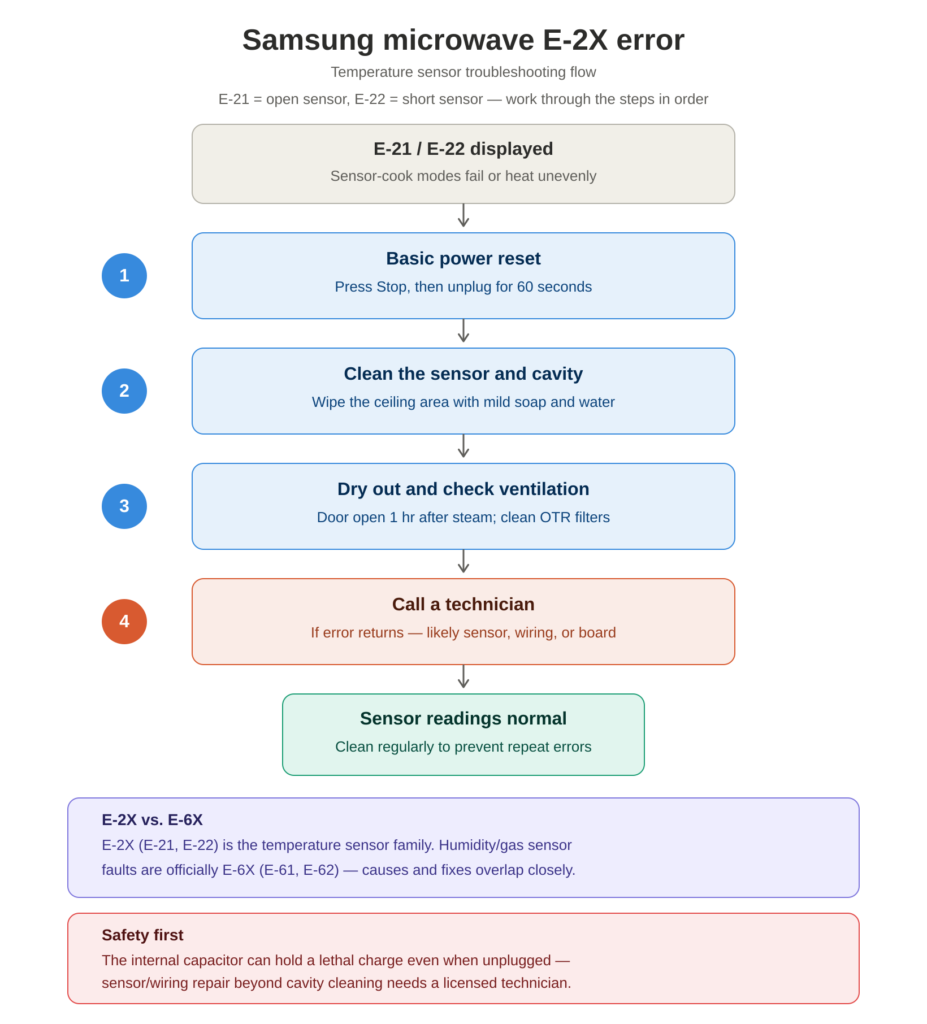
Step-by-Step Troubleshooting
1. Basic Power Reset
<cite index=”54-1″>Press Stop on the control panel and try operating the microwave again; if the error persists, unplug for 60 seconds</cite> before restoring power.
2. Clean the Sensor and Cavity Thoroughly
<cite index=”49-1″>Clean the inside of the microwave thoroughly, including the ceiling area where the sensor is typically mounted, using a damp cloth with mild dish soap</cite> — food residue is the single most common cause of a false E-2X or E-6X reading.
3. Dry Out After Heavy Steam Cooking
<cite index=”47-1″>Leave the microwave unplugged with the door open for at least an hour to allow internal components to dry out</cite> if the error followed a particularly steamy cooking session, then check whether it recurs.
4. Check Ventilation (Over-the-Range Models)
<cite index=”56-1″>Remove and clean grease filters — aluminum mesh filters can go in the dishwasher or soak in hot water with degreaser — and replace charcoal recirculation filters roughly every 6 months</cite>. Confirm the exhaust duct or recirculation path isn’t blocked.
5. Run a Short Test Cycle
<cite index=”56-1″>After cleaning, power cycle and run a short test at 50% power</cite> to see whether the code returns under load.
6. Escalate to a Technician
If E-2X returns after cleaning and confirming ventilation is clear, the fault is most likely the sensor itself, its wiring, or — less commonly — the control board or cooling fan. <cite index=”56-1″>At that point, further diagnosis involves accessing internal components near the high-voltage capacitor and is best left to a professional.</cite>
Replacement Parts You May Need
| Part | What It Does | Notes |
|---|---|---|
| Temperature sensor | Monitors cavity temperature during cook cycles | Model-specific; requires accessing the wrapper panel to replace |
| Humidity/gas sensor | Detects steam output for auto-sensor cooking | Often mounted near the same top-left cavity area as the temp sensor |
| Wiring harness | Connects sensors to the main control board | Frequently the actual fault even when a sensor tests as “failed” |
| Grease/charcoal filter (OTR models) | Maintains airflow that keeps sensor readings accurate | Cheap, DIY-replaceable, and worth ruling out before any sensor swap |
Part costs vary significantly by model, and <cite index=”45-1″>sensor replacement is considered a challenging repair because it typically requires uninstalling the entire microwave</cite> rather than a simple panel swap — factor that into whether DIY or professional service makes more sense for your situation. [Internal link: Samsung Microwave Parts Buying Guide]
Specs & Compatible Models
The E-2X/E-6X sensor error pattern is documented across many Samsung over-the-range and countertop microwaves, including ME20H705MSS, ME21R7051SG, and the SMH9207ST family. Confirm your exact model’s code table in its manual, since C-20 is used as the equivalent legacy label for temperature sensor faults on some older units instead of E-21/E-22.
Warranty Considerations
- Most Samsung microwaves carry a 1-year manufacturer’s warranty on parts and labor.
- Because sensor faults often require accessing internal components, a warranty repair (rather than DIY) is usually the more practical route if your unit is still covered.
- If you purchased an extended protection plan, sensor and control-board failures are typically covered mechanical/electrical faults — check your plan for any exclusions around “sensor cook” or auto-cooking features specifically.
- Attempting to remove the outer wrapper yourself to access the sensor may void remaining warranty coverage — request a technician visit instead if the unit is still under warranty.
Maintenance Tips to Prevent E-2X Errors
- Wipe down the cavity ceiling and walls after any boil-over or greasy cook, since that’s where the sensors are typically mounted.
- Use a loosely fitted microwave-safe cover on splatter-prone foods to reduce residue reaching the sensor area.
- Clean or replace OTR grease and charcoal filters on schedule to keep airflow — and sensor readings — accurate.
- Avoid running back-to-back high-steam cycles without letting the unit vent between them.
- Don’t rely on auto-sensor modes for very small or unusually shaped items, which can produce readings the sensor wasn’t calibrated for and lead to nuisance errors.
DIY Tutorial: What You Can Safely Check Yourself
Tools needed: Soft cloth, mild dish soap, warm water, flashlight (for inspecting the cavity ceiling)
- Unplug the microwave before any cleaning or inspection.
- Locate the sensor area, typically <cite index=”43-1″>on the top-left side of the cavity, under the outer panel</cite> — you’re looking at it from inside the cooking cavity, not opening any casing.
- Wipe the cavity ceiling and sensor vent area gently with a soft, damp cloth and mild soap; avoid abrasive scrubbing that could damage the vent grille.
- Dry thoroughly and leave the door open for a few minutes before restoring power, especially after a wet cleaning.
- For OTR models, remove the grease filter (usually a simple slide-out panel) and wash it separately.
- Restore power and run a short test cycle.
- Stop here if the error returns. Anything beyond cavity-level cleaning — opening the outer wrapper, testing sensor resistance, or replacing the sensor or control board — involves the high-voltage capacitor and should go to a licensed technician.
FAQs
What’s the difference between the Samsung E-2X and E-6X error codes? E-2X (E-21, E-22) is Samsung’s official temperature sensor error family, while E-6X (E-61, E-62) is the separate humidity/gas sensor family. Both sensors feed the microwave’s automatic sensor-cook functions, so faults in either can look similar day to day, but they’re diagnostically distinct codes.
Can I fix a Samsung microwave E-21 or E-22 error myself? Cleaning the cavity and sensor area, checking ventilation filters, and doing a basic power reset are all safe to do yourself. Actually testing or replacing the sensor requires removing the outer wrapper panel and working near the high-voltage capacitor, which is a professional repair.
Is it safe to keep using my microwave if it shows E-2X intermittently? Basic use is generally fine if the error is infrequent and the microwave otherwise heats normally, but stop using it immediately if you notice sparking, a burning smell, or smoke, and don’t rely on sensor-cook modes if the error is affecting them — use manual timed cooking instead until it’s checked.
Why does my microwave only show this error after cooking something steamy? Steam and moisture reaching the sensor area is one of the most common triggers for a false E-2X or E-6X reading. Letting the unit dry out with the door open for an hour after heavy-steam cooking often clears it without any repair.
Does C-20 mean the same thing as E-21 or E-22? Yes — C-20 is used as an equivalent legacy label for a temperature sensor fault on some older Samsung microwave models, while newer models display E-21 (open) or E-22 (short) instead.
How much does it cost to fix a Samsung microwave sensor error? Costs vary widely by model and whether it’s a filter, wiring, sensor, or control board issue. Because sensor replacement typically requires uninstalling the whole unit rather than a simple panel swap, professional labor tends to be a larger share of the total cost than the part itself — get a diagnostic quote before assuming it needs the most expensive fix.
Will replacing the grease filter fix an E-2X error on an over-the-range microwave? It can, if blocked airflow was causing heat to build up and skew the temperature sensor’s readings. It’s a cheap, DIY-safe step worth trying before assuming the sensor itself has failed.
Conclusion
An E-2X error is a temperature-sensor problem, not the humidity sensor it’s often mistaken for — and in the majority of cases it clears up with a thorough cavity cleaning and a dry-out period rather than a parts order. Work through the cleaning and ventilation checks first; if the code keeps returning, that’s your signal to stop and bring in a technician, since the fix from there involves the high-voltage capacitor.
Want more verified appliance fixes like this one? TechSolved publishes real, technician-checked troubleshooting guides — no guesswork, no recycled forum posts. Browse the full library at www.techsolved.blog, or check out these related Samsung repair guides: