
Table of Contents
- How Do You Replace a Washing Machine Drain Pump? (Quick Answer)
- Signs the Drain Pump Has Actually Failed
- What Causes a Drain Pump to Fail
- Safety Precautions Before You Start
- Related Error Codes Tied to a Failed Pump
- Where to Find Your Owner’s Manual and the Right Part
- Tools and Parts You’ll Need
- Test the Old Pump First (Don’t Skip This)
- DIY Tutorial: Replacing the Pump (Front-Load Washers)
- DIY Tutorial: Replacing the Pump (Top-Load Washers)
- Cost and Difficulty: DIY vs. a Technician
- Warranty Considerations
- Preventing Another Pump Failure
- FAQs
- Conclusion & Next Steps
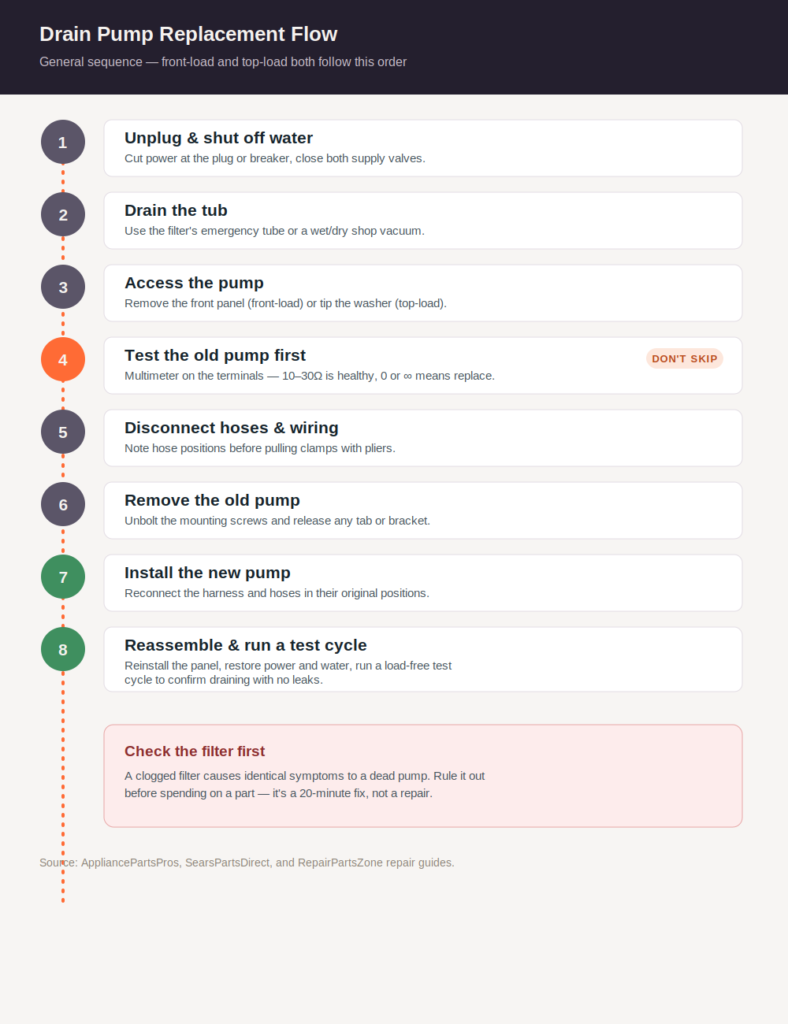
To replace a washing machine’s drain pump, unplug the machine, shut off the water supply, drain any residual water, remove the front or rear access panel to reach the pump, disconnect its hoses and wire harness, unbolt the old pump, install the new one in reverse order, and run a test cycle to confirm normal draining. Before opening the machine, test the old pump with a multimeter or confirm it’s truly dead — a clogged filter or hose causes the exact same symptoms and is a much simpler fix.
Signs the Drain Pump Has Actually Failed
Before ordering a part, confirm these symptoms actually point to the pump rather than a simpler blockage:
- The washer won’t drain at all, and you’ve already ruled out a clogged filter and a kinked or clogged hose.
- Loud humming, rattling, or grinding noises during the drain phase, with little or no water actually leaving the tub.
- The pump runs (you can hear it) but doesn’t move water, suggesting a jammed or broken impeller.
- The pump doesn’t run at all — no sound, no hum — suggesting a burned-out motor or electrical fault.
- Water leaking from underneath the machine near the pump housing.
- A drain-related error code that persists after cleaning the filter and checking the hose.
What Causes a Drain Pump to Fail
- Foreign objects — coins, hairpins, buttons, and underwire from bras are common causes of a jammed or cracked impeller.
- Overuse and heat stress — running back-to-back heavy loads can overheat the motor windings over time.
- Normal wear — like any motor, drain pumps have a service life and eventually wear out even under normal use.
- Electrical surges — a power surge or spike can damage the pump’s motor windings outright.
- Prior neglect of a clogged filter — consistently running a clogged system forces the pump to work harder, accelerating wear.
Safety Precautions Before You Start
- Unplug the washer completely before opening any panel — never work on the pump with the machine powered on.
- Turn off both water supply valves behind the machine before disconnecting any hoses.
- Drain the tub first, either through the filter’s emergency drain tube or with a wet/dry shop vacuum, before opening panels — there will be residual water inside regardless.
- Have a helper move the machine away from the wall if needed; washers are heavy and awkward to maneuver alone.
- Wear work gloves — panel edges and pump housings often have sharp edges.
- If you’re not comfortable removing panels, working near wiring, or the pump is mounted somewhere unusually difficult to reach on your model, this is a reasonable point to call a technician instead.
Related Error Codes Tied to a Failed Pump
A dead or failing drain pump is the end-of-the-line cause behind many drain-related error codes once simpler causes have been ruled out:
- Samsung 5E / 5C — see our full guide on this code, which covers the filter and hose checks to run before assuming pump failure: Samsung Washing Machine 5E Error.
- LG OE — LG’s drain error code, similarly worth ruling out simpler causes on first.
- Whirlpool/Maytag “ND” or F-series codes — model-dependent, but in the same drain-fault category.
Whatever code you’re seeing, don’t jump straight to pump replacement — clean the filter and check the hose first. Our How to Clean a Washing Machine Drain Filter guide covers the single highest-success, lowest-effort fix, and it’s worth ruling out completely before opening the machine for a pump swap.
Where to Find Your Owner’s Manual and the Right Part
Your model number, printed on a sticker inside the door frame or on the back panel, is essential here — drain pumps are not universal, and ordering the wrong part number is one of the most common and avoidable DIY mistakes. Manufacturer sites and major parts retailers let you search by exact model number to confirm compatibility, and many also host model-specific repair videos that show panel removal for your exact washer, which can differ meaningfully even between two washers from the same brand.
Tools and Parts You’ll Need
- Replacement drain pump matched to your exact model number (OEM or a reputable compatible part)
- Phillips and flathead screwdrivers
- Pliers (needle-nose and/or hose-clamp pliers for spring clamps)
- A shallow container or wet/dry shop vacuum for residual water
- Towels
- Work gloves
- A multimeter (to test the old pump before you buy a replacement)
Test the Old Pump First (Don’t Skip This)
Before spending money on a new pump, confirm the old one is actually the problem:
- Unplug the washer and access the pump (see the panel-removal steps below).
- Disconnect the pump’s wire harness.
- Set a multimeter to its lowest ohm range.
- Place the probes on the pump’s motor terminals.
- A healthy pump typically reads somewhere in the 10–30 ohm range; a reading of infinite resistance or zero indicates a dead pump.
If the pump tests fine electrically but still won’t move water, the problem is more likely a jammed or cracked impeller, which may be fixable without a full replacement — inspect it closely before ordering a new part.
DIY Tutorial: Replacing the Pump (Front-Load Washers)
- Unplug the washer and shut off both water supply valves.
- Drain residual water from the tub using the filter’s emergency drain tube or a wet/dry shop vacuum.
- Pull the washer away from the wall for access, with a helper if needed.
- Remove the front access panel — this typically involves removing several screws along the top and bottom edges; some models also require releasing the door boot’s spring clamp first to fully free the panel.
- Locate the pump and motor assembly, usually near the bottom of the cabinet.
- Place a towel beneath the pump to catch residual water, then disconnect the hoses attached to it — needle-nose pliers or hose-clamp pliers will help release spring clamps. Note which hose goes where before removing them.
- Disconnect the wire harness plug from the pump.
- Remove the mounting screws holding the pump assembly in place, and check for a release tab that may need to be pressed to free it fully.
- Remove the old pump and set it aside.
- Install the new pump in the same orientation, reconnect the wire harness, and confirm it clicks securely into its mount.
- Reattach all hoses in their original positions and secure the clamps.
- Reinstall the front panel, replacing all mounting screws, and reconnect the door boot spring clamp if you released it.
- Restore water supply and power, then run a test cycle with no laundry to confirm normal draining with no leaks.
DIY Tutorial: Replacing the Pump (Top-Load Washers)
Top-load pump access is usually from underneath rather than the front:
- Unplug the washer and shut off both water supply valves.
- Carefully tilt the washer forward and lay it down on its front panel (padding the floor first) to access the underside, ideally with a helper.
- Locate the drain pump attached to the bottom of the tub.
- Use pliers to release the spring clamp on the drain hose and pull the hose off the pump.
- Open the small cover protecting the pump’s wire harness plug, then disconnect it.
- Remove the mounting bolts (commonly three) securing the pump to the bottom of the tub.
- Pull the old pump free and set it aside.
- Install the new pump in the same position, reconnect the wire harness, and secure the mounting bolts.
- Reattach the drain hose and re-secure the spring clamp.
- Carefully stand the washer back upright, restore water and power, and run a test cycle to confirm normal draining.
Cost and Difficulty: DIY vs. a Technician
A DIY drain pump replacement typically costs only the price of the part itself, while a professional repair adds labor on top of the part cost. The job is a moderate-difficulty repair — mainly time-consuming rather than technically difficult, since most of the work is panel removal and reattachment rather than anything requiring specialized skill. If your model’s panel access looks unusually complex, if you’re not comfortable with basic tools, or if the repair estimate still comes in well under half the cost of a new comparable machine, DIY is usually worth attempting before calling a technician.
Warranty Considerations
If your washer is still under manufacturer warranty, check your warranty terms before replacing the pump yourself — component-level repairs on a covered machine often need to go through an authorized technician to avoid voiding remaining coverage. Testing the pump with a multimeter and diagnosing the issue doesn’t typically affect warranty status, but the physical replacement itself might, depending on your specific warranty terms.
Preventing Another Pump Failure
- Clean the drain filter every one to three months — see How to Clean a Washing Machine Drain Filter — since a consistently clogged filter is one of the most common contributors to premature pump failure.
- Empty pockets before every load to keep coins, hairpins, and other small objects out of the pump entirely.
- Avoid running excessive back-to-back heavy loads without giving the machine a rest, which can contribute to motor heat stress over time.
- Address drain-related error codes promptly rather than repeatedly resetting and re-running cycles, which strains a struggling pump further.
FAQs
How do I know if it’s the pump and not just a clog?
Clean the drain filter and check the hose for kinks first — both cause identical symptoms to a failed pump and are far simpler fixes. If those check out clean and the pump still won’t move water, or tests bad on a multimeter, the pump itself is the likely cause.
Can I replace a drain pump without removing the front panel?
On most front-load washers, no — the pump and motor assembly sits behind the front panel and isn’t accessible any other way. Some top-load models offer access from underneath instead, without removing a front panel.
How much does a replacement drain pump cost?
Parts vary by brand and model, so check pricing for your exact model number through a manufacturer or reputable parts retailer rather than assuming a universal price, since drain pumps aren’t interchangeable across brands or even across product lines within a brand.
Is it worth replacing the pump myself, or should I call a technician?
If you’re comfortable with basic tools and have a couple of hours, DIY replacement is a moderate-difficulty repair that mostly involves panel removal rather than specialized skill. If your model’s access looks unusually complex or you’re not confident working near the machine’s wiring, a technician is a reasonable choice.
What does it mean if the pump runs but the washer still won’t drain?
This usually points to a jammed or cracked impeller rather than a dead motor — the pump is receiving power and spinning, but something is physically blocking it from actually moving water. Inspect the impeller closely before assuming the whole pump needs replacing.
Will a bad drain pump trip an error code every time?
Not necessarily. Some failures show a specific drain-related code consistently, while others cause inconsistent symptoms depending on load size and how much water the pump is actually able to move before stalling.
Conclusion & Next Steps
A dead drain pump is one of the more involved fixes on this site, but it’s still well within reach for most DIYers — the job is mostly patient panel removal and careful reassembly rather than anything technically difficult, and doing it yourself saves the labor cost of a technician visit. The one step that matters most is the one before you even open the machine: confirm the pump is actually the problem, since a clogged filter causes the exact same symptoms for a fraction of the effort.
If you haven’t already ruled out the simpler causes, start with How to Clean a Washing Machine Drain Filter before you order a part. And if you’re troubleshooting a specific error code or want the full picture of what else could be going on with your washer, our Complete Washing Machine Troubleshooting Guide is the best place to cross-check every symptom against its likely cause.